How to Start a Travel Blog in 10 Simple Steps
So you want to start a travel blog. Awesome!
Travel blogs can be a great source of inspiration, and can be a great way to document an epic adventure or travel-filled lifestyle.
But there are thousands — no, more like MILLIONS — of travel blogs out there on the Internet.
So if you want to start a travel blog that will LAST and not just fizzle out, you want to make sure to do it right from the beginning.
How to Start a Travel Blog in 10 Simple Steps
1. Choose a name
One of the most difficult parts about starting a travel blog is naming it. You want something that represents you or your travel style; something that's catchy that people will remember; and something not too long or cumbersome to type out.
But of course it also has to be something web-friendly, and you need to find an associated domain name that's not taken (THIS is really the challenge!).

Before you worry about that, though, brainstorm some ideas. Spend a few days thinking, jotting names down in your phone or in a journal or, hell, even on napkins as the ideas come to you. Run a few past friends and family members — remember that this name will represent you online for as long as your blog exists, and that means on social media, too.
Once you have a handful of ideas, start poking around to see if you can find a domain name that's free — use a site like NameCheap to search for open domains quickly. I'll be honest — a lot of your “typical” travel-related domain names will already be taken, so that's why it's good to have quite a few ideas when you start.
2. Buy a domain and web hosting
Once you settle on your blog name and have determined that the domain you want is available, now it's time to take the plunge! If at any point you plan to take blogging seriously (i.e. you're not just going to be writing it for Mom), then investing in a self-hosted website from the beginning is worth it. You CAN start out with a free site on WordPress or Blogger, but if you want to migrate it later it's a lot of hassle (believe me, I've done it!).
So let's just get the domain and web hosting now.
I tend to recommend Bluehost* to new bloggers — it's who I purchased my domain from and used to host all my sites for more than 4 years (and I still use them to host 3 smaller sites).
This is a good bet for a newer website since Bluehost's prices are low, their support is usually helpful, and their cPanel (your behind-the-scenes access to your site) it pretty easy to figure out. Signing up is easy, too, and their hosting packages are a lot more affordable than you probably think.
The first step is to choose your hosting package. Bluehost's “Starter” package is incredibly cheap ($7-$8 per month, though it's often on sale for less), though I would recommend the “Plus” package. At $10-$12 per month for 12 months, it's still affordable, but gives you unlimited website space.
Next you'll claim your domain! Your domain is the actual web address for your site, and you get one domain free with your hosting at Bluehost. You could purchase your domain separately (like at NameCheap), but since you get a free domain with hosting at Bluehost, you may as well just get your first domain through them, too.
Lastly, you'll fill out your account and billing info, as well as choose add-ons to your package. You can choose to pay for 12, 24, or 36 months at a time, and can add on everything from site security to Gmail integration.
*Note: Bluehost is fine for new websites, but if you suddenly get Internet famous, you may start to find issues with a shared host like Bluehost. I now host my blog on Performance Foundry, which is managed WordPress hosting. It's much more expensive, though, and I would only recommend going with a host like PF once you decide to stick with the whole blogging thing since it's an investment. I AM an affiliate for Bluehost, however I'm recommending them because that's who I used to host this site for years.
3. Install WordPress
Once you fill out all the relevant info at Bluehost and get your account set up, it's time to install WordPress! WordPress is by far the most popular blogging platform currently in use on the Internet (seriously, look at all these big names who use it), and Bluehost makes it very easy to install. You just click the icon in your cPanel, choose the domain you want to install it on, and you're ready to go.
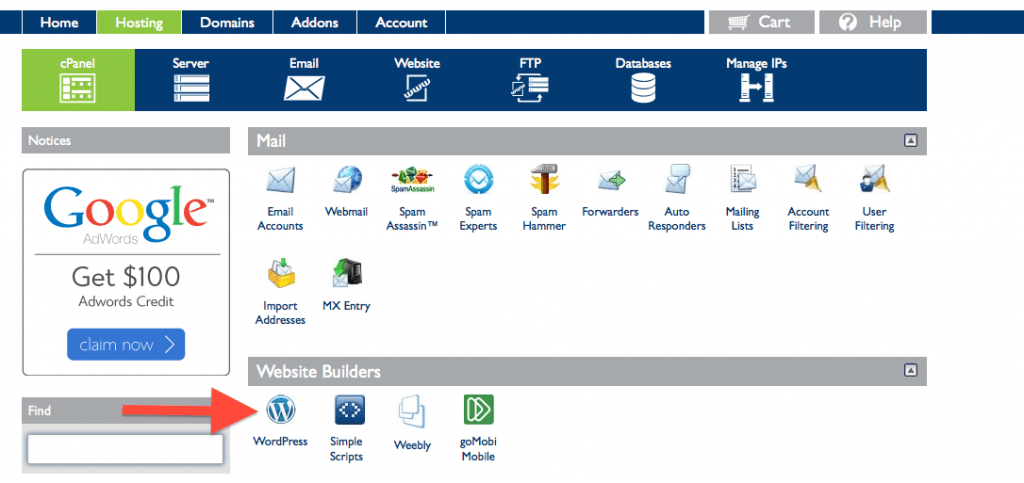
(Most hosts have a very similar process to install WordPress on a new website.)
After you install WordPress, you'll be directed to your log in URL (usually www.yourtravelblog.com/wp-admin) with your username and password. Logging in here will take you to your WordPress Dashboard, and it's from there that the blogging magic will happen. (You won't really be using your Bluehost cPanel from here on.)
4. Decide on a theme
The next challenge comes in the form of deciding what you want your site to look like. WordPress will set you up with a generic free theme, but you definitely can (and should) change this to make it more personalized.
While you may not feel like dropping more money on your fledgling site after just having paid for web hosting, I would urge you to consider it — putting money in to your site NOW, at the beginning, will be worth it in the long run.
Great places to search for themes include:
- Woo Themes
- Theme Forest
- Elegant Themes (Divi is a current favorite)
- Free WordPress Themes
When looking for a theme, obviously pay attention to what looks visually appealing to you. But also keep in mind that your theme should be responsive (i.e. able to be used on all web browsers AND on tablets and smartphones) and should be easy for readers to navigate.
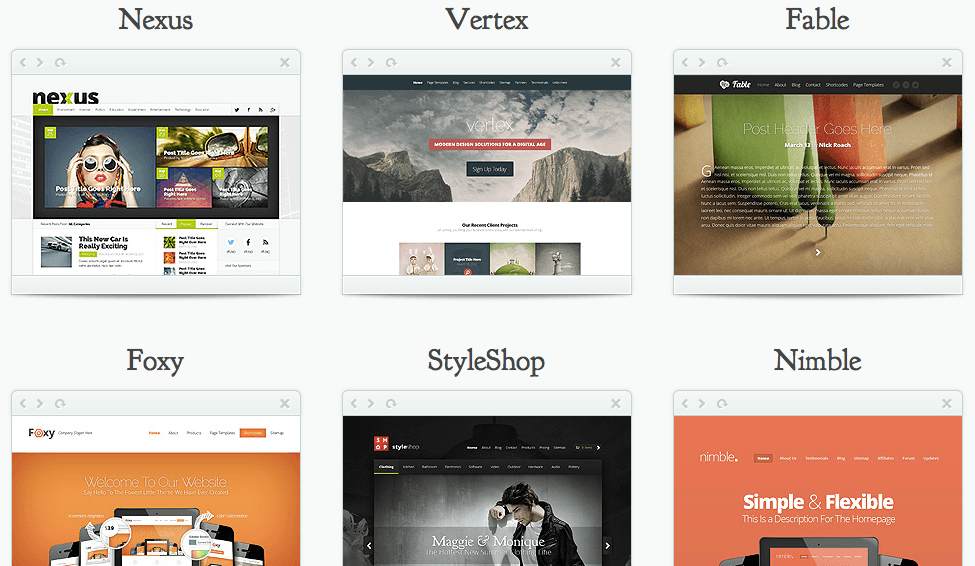
It will probably take some time for you to decide on a theme, install it (to do so, in your WordPress Dashboard just go to Appearance > Themes > Add New), and get it looking how you want it to. Spend time on this now, though, so you can focus on the fun stuff (like actually writing) later.
(If you're curious, I'm currently using a completely custom-built theme. But previously I was using a theme called Simple Mag that I purchased through Theme Forest.)
5. Make a kick-ass “About” page
Once your site is looking snazzy, the first thing you should write is your “About” page.
I'm a firm believer that, when it comes to blogs, people follow people. So you want to make sure that you showcase your personality in a creative way that will make people WANT to follow you. Write up a kick-ass “About Me” page, and fill it with photos and all the personal stuff people will want to know about you. Put a link to this (along with another photo of you) in your blog's sidebar, near the top of your page so new visitors to your blog can find it right away.
Check out my About Me page for an example.

People also seem to like my Travel Timeline that I have nested under my About page.
6. Write some killer content
Next up: the meat of your blog. CONTENT!
Content is king. Or, so they say. I would actually argue that *quality content* is king. You can have a ton of content on your blog, but if it's not good, people aren't going to read it. And if nobody but your mom reads your blog… well, you won't be motivated to keep up with it for very long.
So how do you make your content “good”? Practice, practice, practice. Write, and write A LOT. Especially when you're just starting out, the more you write, the better. When I was first trying to grow my blog, I was posting 7 days a week.
Here are a bunch of things you can post on a travel blog:
- Travel guides/tips
- Inspirational posts
- Photo essays
- Personal stories/strong opinions
- Posts about budgeting/saving money
- Long-form narratives
- Packing lists
- You travel plans/dream destinations
- Interviews with other travelers
The more you write, the quicker you'll find your blogging voice and be able to let your personality shine through in your posts (which is key to building an audience). Write posts that YOU personally would want to read, and don't be afraid to mix it up.
6.1 Learn about SEO
You'll also want to work smart from the beginning, especially if your plan is to turn your blog into a business. You'll want to start getting a handle on SEO (search engine optimization) from Day 1.
SEO can seem really confusing at first, but the basic tenant is to write useful content on topics that people might search for on a search engine like Google. There are things like keywords involved, but basically you want to try to answer questions or solve problems for your readers.
A good place to start with basic SEO is Make Traffic Happen (they also have a great Facebook group).
7. Share on social media
Once you've got your blog rolling, the next step is to tackle social media. Once you've settled on a name for your blog, create a Facebook page and claim a Twitter handle. (Other popular social networks for travel bloggers include Instagram, and Pinterest, but it's fine if you just focus on the two “biggies” at first.)
When considering usernames, try to make these as close to your blog's name as possible so that people can find you easily (for example, my blog is called A Dangerous Business, and I'm @DangerousBiz on almost every social network).
Social media is basically free marketing for you and your blog, so you don't want to ignore it. Growing your audiences and interacting with them will drive traffic to your website – plus it's fun to interact with people interested in the same sorts of things that you are.

There are a bunch of tools out there to help manage your social sharing. Some of my favorites include:
CoSchedule — This integrates with your blog and allows you to schedule social updates before you publish new posts. For example, before I publish a new post, I use CoSchedule to schedule a tweet and Facebook share for right after my post publishes, and then also schedule a few more tweets to be shared throughout the next week.
Buffer — A good scheduling tool that allows you to share your content as well as other people's and to schedule posts to be shared when you aren't online.
Edgar — Like Buffer, but this one allows you to curate a library of different content separated into categories. The content is saved forever in the app and gets cycled through automatically — meaning you don't have to constantly think about adding new updates like you do with Buffer.
8. Read other blogs
As a blogger — and especially as a newer blogger — you should be reading other blogs. Travel blogs, lifestyle blogs, any blogs that you're interested in. Not only will reading more make your own writing better, but you'll also be able to see what other bloggers are doing creatively.
Communities automatically spring up around different blogging niches, and these are nice to be a part of, too. The travel blogging community can be really helpful when you have questions about anything from WordPress plugins to the best place to get pizza in Rome.
9. Write a guest post / get interviewed
A great way to grow your audience organically is to write some guest posts for other blogs, get interviewed, or participate in collaborative posts. Basically anything to get your name, brand, and voice out there. Since you should be reading other blogs anyway, approach those bloggers first to ask about guest posting or interview opportunities.
And you don't have to JUST pitch other travel blogs. If you have a favorite lifestyle or fashion blog and feel like you could write an awesome relevant post for them, pitch those, too!
10. Repeat steps 6-9 over and over
Rinse and repeat. The work of a travel blogger is never done — you have to constantly be writing, creating, sharing, and branching out in order to have a successful travel blog.
I won't lie: it takes a LOT of time and a lot of commitment.
But, after more than 5 years of blogging, I can tell you that it's absolutely worth it!
BONUS step: Take a course
This post outlines how to start a travel blog. But if you reeeeallllly want to dive in and get some in-depth tips on what to do with your blog after you create it, you should consider taking a course.
The major travel blogging course on the market right now is The Business of Blogging by Nomadic Matt, one of the most successful travel bloggers in the world. He runs Superstar Blogging, which offers courses in blogging, travel writing, travel photography, and travel videos.
What else do you want to know about starting a travel blog?

Amanda Williams is the award-winning blogger behind A Dangerous Business Travel Blog. She has traveled to more than 60 countries on 6 continents from her home base in Ohio, specializing in experiential and thoughtful travel through the US, Europe, and rest of the world. Amanda only shares tips based on her personal experiences and places she's actually traveled!




Great stuff! Thank you Amanda, I want to blog for me and my family.
You know you are the first travel blogger that I have seen post something like this on their website, which I’m really grateful for because I to want to become a travel blogger. So this really helps! Thank you so much for this!
Glad you found it helpful!
Hi Amanda,
Thanks so much for this post! I have literally just started a travel blog after 5 years of travel and wanting to write about it and your blog has been the one I have really looked up to. Thanks for the awesome advise! It really helps!
My pleasure, Shara! Glad to hear this helped!
Amanda you are superb here to describe “How to” these are really helpful tips to start a travel blog…I am inspire your writing skills
I love posts like this and I want to thank you for how informative yours was. I always find something new whenever I read another one and I really liked what I found in yours. I have a couple questions, though, concerning other plug-ins to use for Site Back-up Pro and the security option. I know I could probably do the research myself but I’d rather get it from a source who has already tried them and says they work lol I look forward to setting up my own blog someday and I am grateful for all the helpful information you and others have written about. I just hope others enjoy reading my blog as much as I enjoy reading yours though =)
I use Sucuri for site security, and there are tons of backup plugins. I’ve used BackupBuddy in the past for site backups, but you can Google it and find lots of other options (many of which are free). Good luck with your blog!
So here I am just newly minted into Travel Blog Sucess, and already frustrated. With hosting and content and every freaking thing, it’s a lot! Especially when you already spend your entire day on a computer at work. It’s posts like this though, that keep me from freaking out too much. I’ve been reading through your site a bit tonight and I appreciate your optimism, it’s inspiring. I think for me at least, the “About Me” section is always the hardest, like when you go in for a job interview and they ask you to describe yourself. It’s awful.. Anyway.. Just wanted to say thanks!
Aww well hang in there, Heather! I totally know how daunting and confusing it can be when you’re first starting out (I’ve been there, too, after all!). My advice is to focus on one thing at a time so you don’t get too overwhelmed. Eventually things will fall into place and it will get easier!
Thanks for the great information, The biggest problem for me was “How to Start”
Now I am on the sharing on different social networks phase, I hope it will workout…
Well best of luck to you!
Amanda, you are such a good writer! Really enjoyed reading your tips plus all comments.
Thanks so much, Uros! 🙂
First, thank you for all of your wonderful information. Second, I’ve already started a blog with WordPress. I’m really in the process of figuring it out and it is a process. I noticed your #2 step–Buy a domain and web hosting. But I don’t know what that means. What does it mean? Have I hurt myself by creating my blog already on WordPress first? Any suggestions?
Thank you.
Hey Dawn! I’m definitely not a tech person. Did you start your blog on WordPress.com? (So your website address is like… http://www.myblog.wordpress.com.) If so, that’s certainly not BAD. It’s free, which is good when you’re starting out. But if you want to get more serious about your blog in the future, you’ll definitely want to completely OWN it – which means you will need to purchase a website address and set up web hosting like I mention in my post.
If you don’t understand what a domain name and web hosting is, I would suggest Googling it – I’m sure you’ll find better explanations elsewhere than any I can give you!
Thank you Amanda!!
Great tips, thank you for sharing! I look forward to following your blog. Just started my own on blogspot and wondering if I should switch to this approach now, before I go any further. I work in IT and this stuff still intimidates the heck out of me! 🙂
It’s worth thinking about, especially if you think you’ll want to ditch the .blogspot address in the future (having your own domain automatically makes you look more professional!).
Yeah, that makes sense. I guess I still have some pondering to do haha. Thank you! 🙂